Sunday, 23 March 2014

Self Service Password Reset (Error 3000) – After Applying Hotfix (Warning 25050)


Everything was working great, just after applying http://support.microsoft.com/kb/2913228 Hotfix, the Password Reset Portal stopped working and the user would see this error:

An error has occurred. Please try again, and if the problem persists, contact your help desk or system administrator. (Error 3000)
Go to Self-Service Password Reset home page
Server time: 6:29:16 PM

001

The issue happens after the user does the following:
1-  Enter the UserName
001
2-  Answer the QA Gate
002
3-  Receive OTP (SMS or E-mail) if configured
4-  Submit the OTP
003
5-  Enter the new Password


001

Cause:
The problem as stated above happened because of the installed Hotfix, during the installation of the Hotfix this warning was shown:
Error 25050. The Forefront Identity Manager Synchronization Service setup wizard cannot set Windows Management Instrumentation (WMI) permissions. Ensure you have the correct permissions for this operation, and then try running this wizard again. To run WMI remotely, you must manually set the remote enable permission. Invalid namespace

004 HOTFIX Update Sync

Resolution:
1-   Open a Command Window (cmd)
2-   Navigate to
%programfiles%\Microsoft Forefront Identity Manager\2010\Synchronization Service\Bin
3-   Execute the following:
       mofcomp mmswmi.mof
       Press the ENTER key

007 Resolution
That’s it, now you can successfully reset your password.
005

Wednesday, 1 January 2014

Exchange Management Console doesn’t load - The WinRM client received an HTTP server error status (500)

The attempt to connect to http://exchange.contoso.lab/Powershell using "Kerberos" authentication failed: Connecting to remote server failed with the following error message: The WinRM client received an HTTP server error status (500), but the remote service did not include any other information about the cause of the failure. For more information, see the about_Remote_Troubleshooting Help topic.

001


Solution:

Open Exchange Management Shell

Import-Module ServerManager

Remove-WindowsFeature WinRM-IIS-Ext

Add-WindowsFeature WinRM-IIS-Ext


002


And now try to open EMC


003


Done.

Tuesday, 30 April 2013

Adding a 3rd Exchange Server 2010 to an existing 2 Node DAG

In this post i will show you how to add a third node to an existing 2-Node Exchange Server 2010 Database Availability Group.
For detailed information about Exchange 2010 DAG, see the topic “Understanding Database Availability Groups” on TechNet Library.
- Start by opening EMC and navigate to Organization Configuration > Mailbox > Database Availability groups.
You will see the existing DAG and the current Member Servers (Member02, Member01) in my case.
001

- Right click your existing DAG and select “Manage Database Availability Group Membership”.
002

- Click “Add” to add the third Exchange 2010 Server.
003

- Select the third Exchange server and hit “OK”.
004

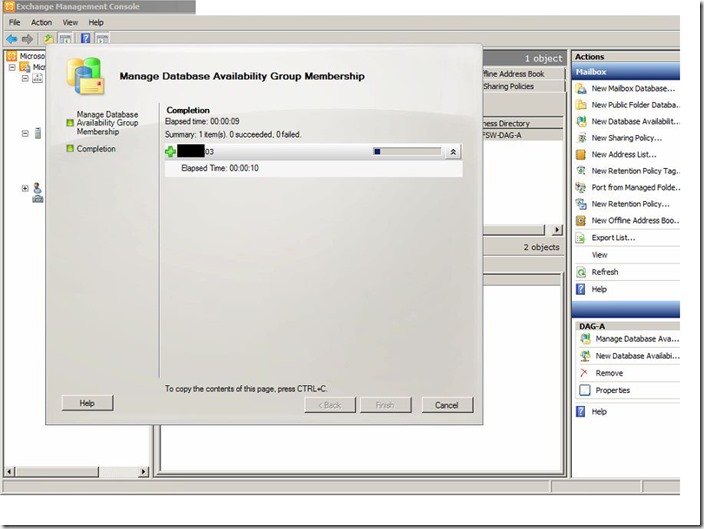
- The third server will be listed in the DAG members list, click “Manage” to execute the Add request.
005
006

- Wait until the command executes, then click “Finish”.

007

- Three member servers (Member03, Member02, Member01) in DAG-A.
008
That’s it.

Sunday, 24 March 2013

Create a new Mailbox Database and add a Database Copy – Exchange 2013 DAG

In this post i will show you how to create a new Mailbox Database and add a copy of it, keep in mind that you have to have a functioning Database Availability Group (DAG).
For more information about Exchange 2013 DAG check this “Database Availability Groups

- First, log in to Exchange Admin Center by opening your browser then typing “https://YourExchangeFQDN/ecp”
- Click Servers, then Databases.
- Click the + sign to create a new database.
001

-  The new database window opens.
002

- Type the Mailbox database name ”DB003 in my case”, browse where you want to create it and make sure the “Mount this database” checkbox is checked then click save.
002a

 003

- After the database has been created you will see it in the list of databases.
004

- Now you will add a copy of DB003, click More then select “Add database copy”.
005

- Click browse to specify where you want to add a copy of this database.
006

- Select the Exchange server that will hold the copy.
007

- Then click save.
008

- The database will begin seeding.
009

- And will be successfully saved.
010

- As you can see the “Servers with copies” column will show the two exchange servers that hold copies of this database.
011

Done !!

Tuesday, 15 January 2013

Lync Server 2013 Monitoring/Archiving

There is no longer separate roles for Monitoring or Archiving.

Each front-end server communicates directly with the monitoring and/or archiving database, eliminating the need for a separate monitoring/archiving server.

Follow my previous post to define and install the SQL Instances LyncMonitoriny & LyncArchiving and to associate them to a pool in the Topology builder.

 http://mchahla.blogspot.com/2013/01/installing-microsoft-lync-server-2013.html


I will install the Databases on SQL-02.chahla.local


- Open Lync Server Management Shell (if you don’t have it ,Open the installer and install Lync Server 2013 Core Components) and Run this command:

Install-CsDatabase -LocalDatabases

008

- Click Deploy Monitoring Reports.

012

- Select the Monitoring Database and type the SQL Server Reporting Services instance, then click Next.

013

- Specify the credentials, then click Next.

014

- Specify the Read-Only Group, then click Next.

015

 016

 017

- Reports will be published.

018

 019

 020

- Successfully deployed.

021

- To Access the LyncMonitoring Reports, from a browser type the URL http://localhost/Reports_LyncMonitoring if you are accessing from the same machine, otherwise if you are accessing from another machine replace localhost by the machine fqdn >> sql-02.chahla.local

022

- Click on LyncServerReports.

023

- Click on Reports Home Page.

024

- A list of available reports will show.

025

- This is one of the reports.

026

You will see the records are filled after some time when the users start some sessions.

027


For Archiving, create a policy and enable archiving.

033 

- Apply it to some users.

 034

- To access LyncArchiving open it in SQL Management Studio.

009

- (localhost)\LyncArchiving.

010

011

- The table dbo.Messages has all the IM messages.

 028

- Right click >> Select top 1000 rows.

029

- In the Results> Body Column, Right click at any row and select copy, then paste it in a notepad.

030

031

- Rename the notepad txt file to html file and open it.

032

- Or you can simply use the command Export-CsArchivingData to export the data that will be in the .eml extension , rename the file to .mht to view it in a browser.

Check this article for more detailed info about exporting archived data  http://technet.microsoft.com/en-us/magazine/hh328432.aspx


Done.